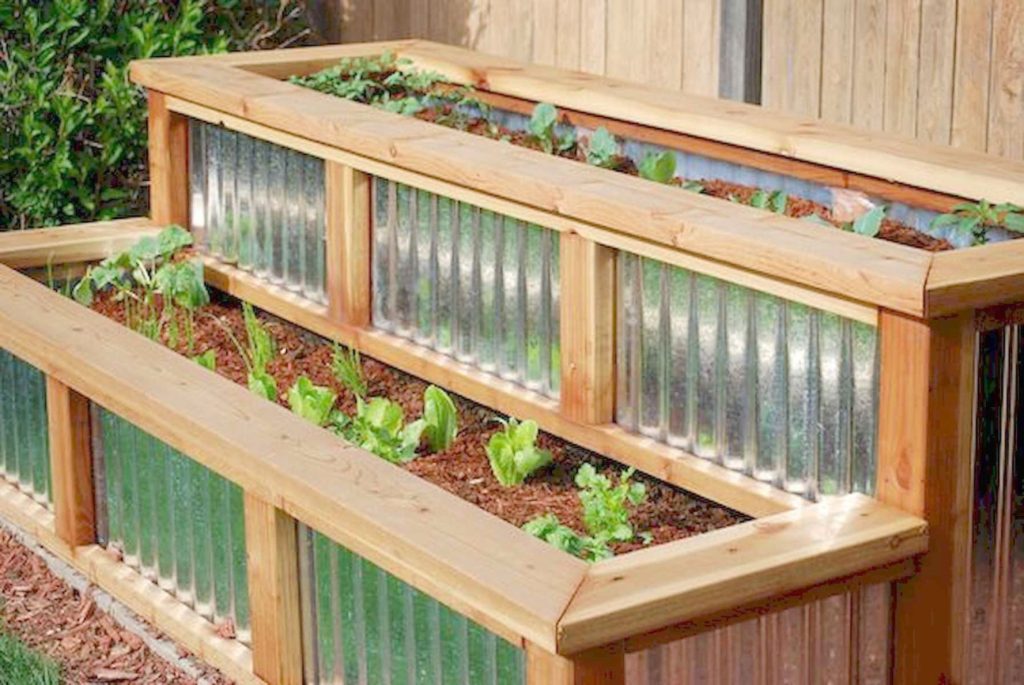
- Raised beds are garden structures that are built above ground level.
- Everyone can build raised garden beds with legs with the right equipment and materials.
- Use a high-quality type of wood like cedar to build a perfect raised garden bed.
- A raised garden bed requires less maintenance than regular in-ground beds.
Raised garden beds, or garden boxes, are ideal for cultivating flowers and vegetables. In fact, the possibilities for what to plant in the raised garden bed are limitless!
Garden beds will keep pathway weeds out of the garden soil, act as pest protection, prevent compaction, and save space. In addition, your back and knees will be grateful for the garden beds.
Many premade garden beds are simple to assemble, but you can always make your own to your liking. If you are crafty or want to learn more about the nitty-gritty of raised garden beds with legs, we are here to teach you how to build one as an easy do-it-yourself project.
Continue reading to learn in detail how to build a raised garden bed and grow flowers, veggies, or herbs in an elevated fashion with the help of this DIY project.
What Is a Raised Garden Bed?
Raised beds are table-like garden structures that are built above ground level. The term “raised” refers to the bed’s soil level being higher than the surrounding soil. The term “bed” suggests a place to grow your plants without having to step on the planting area. Garden-raised beds with legs give gardeners control over the soil health in which the plants grow.
There is plenty of room for rich garden soil in raised garden beds. You should just make sure to cultivate a large, deep-growing area that will encourage plant roots to grow outward and down. These beds put plants at eye level, allowing for better pest observation. These beds are frequently encased in frames and made of long-lasting materials.
And when the beds are contained within a structure, gardeners can work on them without affecting the overall shape. Cedar is a popular long-lasting material for raised garden beds since it is simple to cut and drill and weathers naturally.
You should keep your garden beds small, around 3 to 6 feet long, if you want them to be easily transported. Your preferences will determine the garden bed height.
For many gardeners, the top rail should be at waist level to make their gardening more comfortable. In addition, you can create great drainage with a landscape fabric base and wire mesh.
Tools And Equipment to Build a Raised Garden Bed With Legs
To make the building a lot easier, we have created a list of tools and equipment you should have:
- Hammer or cordless drill
- Eye protection
- Latex gloves
- Saw
- Landscape fabric
- Scissors
- Wood glue
- Staple gun
- Tin snips
- Indelible marker
- Cotton rags
- Clamps
- Nails or screws
- Tape measure
- Decorations.
Once you’ve gathered all the essentials, it’s time to get to building.
Step-by-step Process to Build a Raised Garden Bed With Legs
The most important thing for a DIY raised garden bed is to use the right materials. Cedar is the best wood for garden beds, so we recommend using cedar wood planks to build a long-lasting, rot-resistant raised bed. The length of time your wood will last is determined by the cedar type and the weather conditions in your area.
In addition, you can learn step-by-step how to make your DIY raised planter box in just a few hours:
1. Cut the Wood
Consider the size of your garden when deciding the size of your wood pieces. For cutting the cedar wood planks, you should use a saw. After making the cuts, it is wise to keep the remaining wood as bottom slats or support pieces.
If you want your DIY raised planter box to be square, you will need eight pieces of the same size. You will need four long and four short pieces for a rectangular shape.
Keep in mind that the bottom pieces will be inside the finished box, so it is best to wait until you have built it to measure and cut them. Because they will be forming slats on the bottom, they should be shorter than the inside of your box. The number you require depends on the length of your bed with legs. Leave at least one inch between them so that some space remains for drainage.
For example, if you decide to make a rectangle shape, which is the most used one, you will need:
- Four sections at 36 inches (one-by-six boards)
- Four sections at 24 inches (one-by-six boards)
- Six sections at 24 inches (one-by-four boards)
- Four sections at 30 inches (four-by-four boards)
2. Attach the Legs
Of course, you will be building your bed in an upside-down position, so you should arrange the four boards at 24 inches in length on a flat surface. Put the short pieces at their ends and screw the boards into the sections.
Do the same with the rest of the legs, making sure that the legs are on the inside of the boards. Assemble the legs so that they are long-lasting and sturdy to support the weight of the soil. Of course, you can also use a generous amount of wood glue when attaching the legs.
4. Attach the Remaining Bed Sides

Construct another rectangle of the short and long one-by-six boards on top of the built box. Put a longboard on top of a lower longboard and screw it to the four-by-fours. Do the same for the other side.
Next, screw a shortboard to the four-by-fours and put another shortboard on top of that. Do the same for the other side.
5. Measure Your Hardware Cloth
Roll out your hardware cloth and lay your bed on top of the cloth. Make sure to leave at least two inches on all sides and use a straight edge to mark off the hardware cloth.
6. Insert the Bottom Slats Into the Raised Bed
Insert the six slats of the sections that are 24 inches long into the bed bottom. Use two screws per end of the slats. You should put the slats against the bottom edges of the sideboards. We advise you to add pieces to the bed’s bottom to support the bottom slats.
Place the pieces evenly along the garden bed’s long and short sides using wood glue. Because the bottom slats rest on the support pieces, position them directly below where you want the bed bottom to be.
7. Include the Hardware Cloth
Flip the garden box upright. Cut the hardware cloth with the tin snips and put it in the tray’s bottom. Press all of its sides upward. For each corner to have perfect angles, make a one-inch cut and staple them in place.
8. Cut the Landscape Fabric
Roll the landscape fabric into your bed tray. Leave additional space of at least a foot at the ends. Put the landscape fabric in the center and staple and trim the excess fabric.
9. Fill Your DIY Raised Garden Bed With Soil
You should add high-quality soil to your bed with legs. Add the soil bags gradually to the tray, not abruptly, as you may tip your bed.
Plants usually need 12-22 inches of soil. But if you plan to plant veggies, fill it with 18-22 inches of soil so that there is enough soil for the roots to grow strong.
It is wise to add a compost layer over the soil to provide the plants with the needed nutrients. And for your plants to thrive, you should put your bed with legs on an even surface and in an area with direct sunlight to ensure that your plants get enough light.
Tips for Building Raised Garden Beds With Legs
We have some tips for your DIY raised garden bed that you will find helpful during the building process:
Height, Width, and Length of Your Garden Bed With Legs
Gardeners can build their beds to any height up to 36 inches. Many people make their beds 11 inches high, which is equivalent to two stacked 2 inches x 6 inches boards.
If the soil beneath the bed is good, the roots can go down deeper to access more soil, allowing gardeners to have a bed as low as 6 inches high.
When it comes to width, it is best for your DIY raised garden bed not to be wider than 4 feet across. It is critical to keep the width this narrow to prevent stepping on the bed and compressing the soil. The garden beds can be any length as long as you install cross supports every 4 to 6 feet along their length to avoid bowing.
Frames for a Raised Bed
You can make a frame for a garden bed with legs from various materials, such as concrete blocks, brick, masonry, wood, lumber, or landscape timbers. If you want to prevent bending while working, you can elevate your bed.
Type of Wood for Your Raised Garden Bed
We have already mentioned that the most durable option is cedar. However, there are more options to consider if cedar is too expensive for you.
Black locust wood is rot-resistant, so it can last for years. If you choose this hardwood, you won’t have to worry about moisture, insects, and fungal infections.
Cypress wood is not as long-lasting as hardwood, but it is resistant to rot and pests. Plus, you won’t have to break the bank if you choose this wood.
Spruce wood is a low-cost option that is stronger than other softwoods, and it is rot- and pest-resistant. The wood is lightweight, easy to work with, and durable.
Another option is Douglas Fir wood. It is more expensive but also more durable than other softwoods. And oak is a great option since it is more resistant to insects and rots than softwood and lasts much longer.
If you are a fan of organic gardening, choose untreated wood. There is plywood available that does not contain formaldehyde glue on the bottom.
Other useful hints:
- Do not construct a huge raised garden bed with legs because it may bow when adding water or soil.
- Before screwing in your joints, use wood glue to avoid problems like water seeping into the seams.
- If your raised garden bed is exposed to a lot of heavy rain, drill a few drainage holes in the bed’s bottom.
- If you plan to put your raised bed inside at some point, make sure to put a tray to catch the drainage.
- To further protect your wood, apply raw linseed oil.
How Much Will You Pay for a DIY Raised Garden Bed With Legs?
As you can see, building a raised garden bed is an easy project that can take just a few hours. However, it is crucial to know how much you will have to pay for your DIY project.
A DIY raised garden bed made of wood will typically cost between $25 and $50 per square foot. And the kit for constructing it costs an average of $145.48.
Benefits of Building a Raised Bed with Legs
We like the look of beautiful garden beds in gardens. The eye-catching garden boxes add aesthetic value, which is a significant benefit for your property. But a raised garden bed does not only look great in your garden- it also reduces the workload that comes with maintaining regular in-ground beds.
This type of gardening is becoming increasingly popular due to the endless benefits it offers:
You Can Easily Control the Bed’s Health
The raised surface elevates the plants above contaminated soil, preventing plant roots from contamination. You won’t have surface issues that prevent you from gardening if you use a raised garden bed.
Most importantly, you can control drainage and soil health more easily by elevating it above the surrounding ground. Also, the closed bottom will protect your plants from gophers, rabbits, squirrels, moles, and so on.
You Get Better Soil Conditions
No matter the type of soil in your area, whether it is bad for gardening, sandy, or low in organic matter, you can grow a productive raised garden bed. You can keep the soil in your raised bed nutrient-rich by adding compost, soilless media, or garden soil.
Because no one walks on a raised bed, the soil compaction will be reduced, allowing for more free movement of air and water through your soil. You can make your soil richer by making any necessary changes whenever you want.
So, a raised garden bed with legs allows you to have full control of the soil, and you can grow your plants successfully regardless of how poor the surrounding soil is. We believe that this is the biggest benefit – making the soil in the garden box far superior to your native soil.
Higher Yields
Higher yields are highly beneficial for veggies since you can plant them at higher densities, far apart to prevent crowding but still close to shade out the weeds. By doing this, you will get more produce per square foot. In addition, harmful worms won’t be an issue if your raised garden bed is elevated above the ground. Otherwise, the worms can wreak havoc on the roots and decrease yields.
Improved Accessibility
A raised garden bed with legs is easier to access than traditional gardens. These garden boxes are an excellent choice for gardeners with disabilities, limited mobility, or those who prefer to avoid physical strain.
Gardening is possible for gardeners with limited mobility by elevating the raised beds 1-3 feet high. It is also smart to have wide paths between the raised garden beds to allow wheelchairs and walkers safe access. Even if you are in great physical condition, you won’t have to stoop to water, weed, and do other gardening stuff since the soil level will be higher. Furthermore, you can put wheels on your raised garden bed to move your plants to different areas more accessible for you.
Reduced Maintenance
A raised garden bed requires less weeding since store-bought soil contains fewer weed seeds than your native soil. And as mentioned, plants will reduce weed growth since you will plant them closer together than you would do in a regular garden bed.
A raised garden bed will be easier to control when it comes to pests like voles and moles. If you have a problem with burrowing rodents, you can line the garden bed’s bottom with hardware cloth or poultry wire.
Small digging animals can be kept out by screening the bottom of the garden beds. You can even use a bird netting can to cover your precious garden beds. If you think that it would be helpful, you can even add an overhead frame to support freeze or frost protection covers. Most importantly, the reduced maintenance and the height of your raised garden bed will prevent backaches.
Conservation of Water

Gardeners can use canvas soaker hoses, drip tubing or plastic sprinkler hoses to supply water to a raised garden bed. These watering methods are effective at sprinkling water in long, narrow garden beds. Furthermore, they can prevent diseases by running water into the soil rather than watering the leaves with overhead irrigation.
Extended Growing Season
Correctly designed raised garden boxes can prolong the growing season since the boxed soil will warm up faster than in-ground gardens when the weather is warm. As a result, gardeners get quicker germination and longer planting seasons.
Also, a raised garden bed with proper preparation will have better drainage, making them useful in places with bad in-ground drainage. Even in the case of floods, your plants won’t be destroyed by drowning.
You Can Build a Raised Garden Bed Anywhere
You can build a raised garden bed with legs wherever you want, even in places where the native soil does not permit an in-ground garden. As long as your vegetables and flowers have sufficient access to sunlight, you can build them even on concrete surfaces.
FAQs
How deep should a raised garden bed on legs be?
The garden beds should be at least eight inches deep to accommodate plant roots, as most plant root systems require six to eight inches of soil depth for healthy growth. However, some plants will require a depth of eight to 12 inches.
What can you add at the bottom of a raised garden bed with legs?
You can add garden waste products such as dry leaves, grass trimmings, dry leaves, or leaf mould at the bottom of your DIY raised garden bed. These will increase the organic content of the soil and provide the ideal foundation for your plants to thrive.
What is the best base for raised garden beds?
The best base or soil for a raised garden bed with legs is half of the healthy loam (screened soil) and half of the screened compost, which can include your compost as well as fish compost, mushroom manure and animal manure.
Can I place rocks at the bottom of my raised garden bed?
Placing rocks in the bottom when building raised garden beds is not the best idea. In fact, we recommend avoiding rocks since they can make an artificial water table that can prevent proper drainage. And drainage is critical in these types of garden beds.
How to perfectly level up the raised garden beds?
Fill in the garden bed with soil and soil amendments. Rake your soil smooth and level with the bed top after adding soil and any amendments needed, like lime, peat moss, compost, and rock phosphate. As time passes, your soil will settle, making room for the addition of mulch or extra soil.